Version 2.5 overview and User Guide
Mass Updater SSH Tool: Automate Your Network Management
Designed specifically for WISPs (Wireless Internet Service Providers) and Network Engineers, the Mass Updater SSH Tool is a powerful and intuitive Windows application built to streamline and automate routine tasks across large fleets of network devices.
This tool empowers you to efficiently manage configurations, deploy updates, run diagnostics, and gather information from hundreds or even thousands of devices with unprecedented speed and control.
Key Features & Benefits:
- Intelligent Automation: Execute custom SSH scripts across multiple devices concurrently, saving countless hours and reducing manual error.
- Flexible Device Targeting: Effortlessly define your target devices using:
- CSV Device Lists: Import and manage lists of devices with associated names.
- CIDR Subnet Scanning: Automatically discover and interact with all IPs within specified subnet ranges, with advanced options to exclude specific IP addresses from your scan.
- Powerful Scripting Engine:
- Craft dynamic scripts with support for variables, allowing for reusable and adaptable command sequences.
- Implement conditional logic (
IF_LAST_OUTPUT_CONTAINS,IF_LAST_OUTPUT_EQUALS,IF_DOES_NOT_CONTAIN) to create intelligent scripts that adapt based on prior command outputs. - Includes a built-in warning system to alert you to potentially risky commands like “reset” or “reboot” before execution.
- Secure Credential Management: Store all your SSH usernames and passwords securely. Passwords are encrypted using Windows Data Protection API (DPAPI), ensuring your sensitive information is protected on your local machine.
- Optimized Performance:
- Adjust concurrent session limits to match your network capacity and personal workflow.
- Optionally ping devices before SSH to quickly identify and skip unresponsive hosts, enhancing efficiency.
- Support for multiple SSH ports, allowing the tool to intelligently try different ports until a connection is established.
- Automated List Building: Automatically parse command output to extract device names and IPs, enabling you to generate new, organized device lists for future use.
- Comprehensive Logging & Reporting:
- Monitor real-time progress and detailed output directly within the application’s intuitive log display.
- Automatically save detailed command responses from each device to individual files, with an option for “clean” output (raw data only), perfect for configuration backups.
- Generate clear failure logs for quick identification of devices that couldn’t be processed.
- AI-Powered Scripting Assistance: Integrated with Google’s Gemini API, the tool offers intelligent assistance for writing and refining your SSH scripts. Just ask your questions directly in the application!
Mass Updater SSH Tool – User Manual
Version: 2.5 (Updated)
Author: Kevin Byrd
Target Audience: WISPs (Wireless Internet Service Providers) and Network Engineers
1. Introduction
The Mass Updater SSH Tool is designed to help network engineers and administrators automate tasks across multiple network devices that support SSH (Secure Shell). It allows for the execution of custom scripts on lists of devices or entire subnets, credential management, concurrent operations, and detailed logging. The tool also integrates AI assistance via the Gemini API to help users craft or modify scripts.
Key Capabilities:
- Network Profile Management: Organize device lists, logs, and credentials into separate network profiles.
- Flexible Device Targeting:
- Use CSV files to define lists of devices (IP and optional name).
- Specify entire subnets in CIDR notation for broader operations, with the ability to exclude specific IPs.
- Powerful Scripting:
- Create and manage text-based scripts.
- Use variables within scripts for dynamic command generation.
- Implement conditional logic based on command output (IF_LAST_OUTPUT_CONTAINS, IF_LAST_OUTPUT_EQUALS, IF_DOES_NOT_CONTAIN).
- Secure Credential Management:
- Store multiple SSH username/password combinations.
- Passwords are encrypted using DPAPI (CurrentUser scope) for enhanced security on the local machine.
- Efficient Operations:
- Run SSH commands concurrently to save time.
- Optionally ping devices before attempting SSH to skip unresponsive hosts.
- Specify multiple SSH ports to try per device.
- List Building: Automatically generate new device lists based on the output of specific commands.
- Comprehensive Logging & Output:
- Real-time UI logging of operations.
- Optionally save full command output from each device to individual files.
- Generate detailed failure logs for devices that couldn’t be processed.
- Option for “clean” output mode for backups.
- AI-Powered Script Assistance:
- Integrates with Google’s Gemini API to provide help with script creation and modification.
- User-Friendly Interface: Provides controls for managing lists, scripts, credentials, and monitoring progress.
- Risky Command Warning: Provides a warning if the script contains potentially dangerous keywords.
2. System Requirements & Setup
2.1. System Requirements
- Windows Operating System.
- .NET8 Framework/Desktop Runtime (Should prompt to install on first run).
- Network connectivity to target devices via SSH.
- Internet connectivity if using the AI scripting assistance feature.
2.2. Initial Setup & Configuration
Application Data Folder: The tool stores all its data (network profiles, router lists, scripts, logs, credentials, and device responses) in your user’s AppData folder to keep your application directory clean and facilitate user-specific configurations. The main folder is: C:\Users\<YourUsername>\AppData\Roaming\MassUpdaterSSH
Within this MassUpdaterSSH folder, you will find:
- networks\: Contains subfolders for each network profile you create (except for the Default profile).
- scripts\: A global folder for all your SSH scripts (.txt files). Scripts are shared across all network profiles.
For the Default network profile, its specific data folders are directly under MassUpdaterSSH:
- routers\: Stores router/device lists (.csv files).
- logs\: Stores runtime and failure logs.
- device-responses\: Stores output saved from devices.
- ssh_creds.json: Stores encrypted credentials for the Default profile.
For custom network profiles (e.g., MyCustomerNetwork created in the UI), the structure will be: MassUpdaterSSH\networks\MyCustomerNetwork\routers\ MassUpdaterSSH\networks\MyCustomerNetwork\logs\ MassUpdaterSSH\networks\MyCustomerNetwork\device-responses\ MassUpdaterSSH\networks\MyCustomerNetwork\ssh_creds.json
One-Time Data Migration: If you previously used a version of this tool that stored files in its installation directory, the application will attempt to automatically migrate your existing routers, scripts, logs, device-responses folders, and ssh_creds.json file to the new AppData location upon first run.
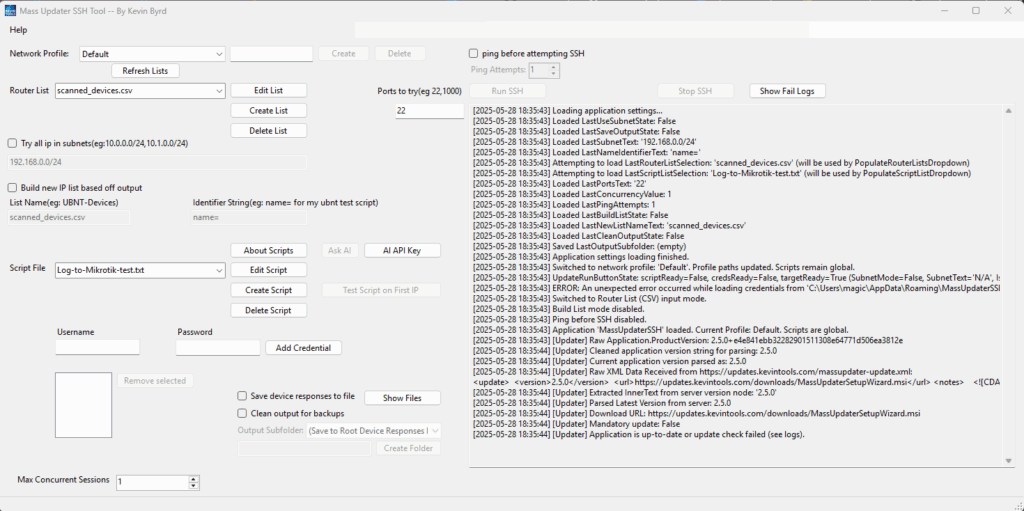
3. Main Interface Overview
The main window is divided into several sections for managing profiles, targets, scripts, credentials, and operations.
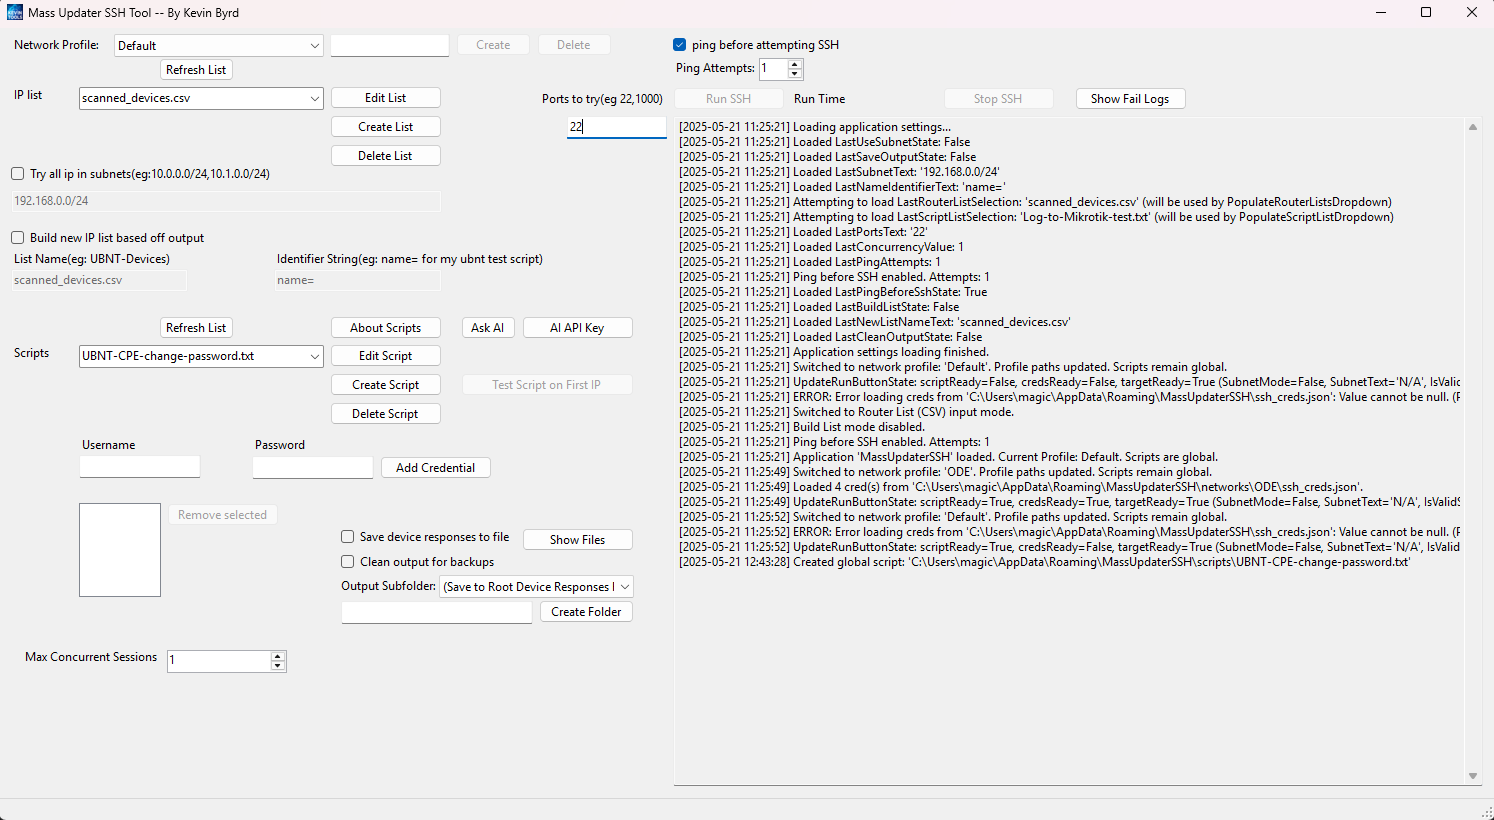
(Image of the main application window – Mass-Updater-SSH-Tool.)
3.1. Network Profile Management
This section, typically at the top-left of the application, allows you to organize your work into different network contexts. Each profile has its own router lists, logs, device responses, and credentials. Scripts are global.
- Network Profile Dropdown (networkComboBox):
- Lists available network profiles.
- Select a profile here to load its associated data.
- A Default profile is always available. Its data is stored directly under the MassUpdaterSSH AppData folder.
- New Profile Name Textbox (newNetworkNameTextBox):
- Enter the desired name for a new network profile.
- Create Button (createNetworkButton):
- Creates a new network profile folder structure within MassUpdaterSSH\networks\<ProfileName>\.
- The profile name will be sanitized to remove invalid characters.
- Delete Button (deleteNetworkButton):
- Deletes the currently selected network profile and all its associated data (router lists, logs, credentials).
- The Default profile cannot be deleted this way.
- Global scripts are not affected.
3.2. Target Device Specification
Choose how you want to define the devices to run scripts on. This section is typically below the Network Profile management.
A. Router List (CSV) Mode: (Default mode)
- IP list Dropdown (routerListComboBox):
- Displays .csv files found in the current network profile’s routers folder.
- Select the device list you want to use.
- Create List Button (createListButton):
- Prompts for a new list name. Appends .csv if not provided.
- Creates a new, empty CSV file in the current profile’s routers folder with a header: # IP,Name,Notes.
- CSV File Format: Each line should contain an IP address. Optionally, a comma and a name can follow. Lines starting with # are comments.
Example:
# My Routers

192.168.1.1,Main_Router

192.168.1.2,AP_Living_Room

10.0.0.5- Edit List Button (editListButton):
- Opens the selected CSV file in the default system editor for CSV files (e.g., Excel, Notepad).
- Delete List Button (deleteListButton):
- Deletes the selected CSV file from the current profile’s routers folder.
- Refresh List Button (refreshListsButton):
- Reloads the IP list and Script list dropdowns to reflect any external changes to the files.
B. Subnet Mode:
- “Use Subnet(s) Instead” Checkbox (useSubnetCheckBox):
- Check this to switch from CSV list mode to subnet mode.
- When checked, the IP list dropdown and its related buttons are disabled.
- Subnet Input Textbox (subnetTextBox):
- Enter one or more subnets in CIDR notation (e.g., 192.168.1.0/24).
- Multiple subnets can be entered, separated by commas (e.g., 10.0.0.0/24,10.1.0.0/16).
- IP Exclusions: You can also specify individual IP addresses to exclude from the generated subnet range by prefixing them with an exclamation mark !.
- Example: 10.0.0.0/24,!10.0.0.1,10.1.0.0/16,!10.1.0.50
- The tool will attempt to generate all IP addresses within the specified range(s) and then remove any explicitly excluded IPs.
- Large CIDR Warning: For very large CIDR blocks (e.g., /8 or smaller prefix), a warning will appear due to the potentially huge number of IPs. You can choose to cancel or proceed.
3.3. Script Management (Global)
Scripts are stored globally and can be used across any network profile. This section is typically located below the target device specification area.
- Scripts Dropdown (scriptListComboBox):
- Displays .txt files found in the global MassUpdaterSSH\scripts\ folder.
- Select the script you want to execute.
- Create Script Button (createScriptButton):
- Prompts for a new script name. Appends .txt if not provided.
- Creates a new, empty script file in the global scripts folder.
- Edit Script Button (editScriptButton):
- Opens the selected script file in the default system editor for text files (e.g., Notepad).
- Delete Script Button (deleteScriptButton):
- Deletes the selected script file from the global scripts folder.
- About Scripts Button (scriptHelpButton):
- Displays a help window detailing script syntax and features (see Section 4: Scripting Guide).
- Test Script on First IP Button (testScriptSingleDeviceButton):
- Allows you to run the selected script on the first IP address from the currently selected Router List (CSV) or the first IP generated from the first subnet entry in Subnet Mode.
- This is useful for quickly testing a script’s logic on a single device before a mass run. Output is shown in the main log window.
3.4. SSH Credentials Management
Manage the credentials the tool will attempt when connecting to devices. This section is typically below script management.
- Username Textbox (usernameTextBox):
- Enter the SSH username.
- Password Textbox (passwordTextBox):
- Enter the SSH password. (Uses system password char for masking).
- Add Credential Button (addCredentialButton):
- Adds the entered username and password to the credentialsListBox for the current network profile.
- If a credential is selected in the list, this button changes to “Add as New” to clarify it adds a new entry rather than modifying the selected one directly.
- Credentials ListBox (credentialsListBox):
- Displays the usernames of added credentials for the current profile.
- Selecting a credential here will populate the Username and Password textboxes (allowing you to see the username and password).
- Remove selected Button (removeCredentialButton):
- Removes the selected credential from the list for the current profile.
- Security: Passwords are encrypted using Windows Data Protection API (DPAPI) with CurrentUser scope. This means they are generally only decryptable by the same user account on the same computer where they were encrypted.
3.5. Execution Settings
Configure how the SSH operations are performed. These controls are typically located towards the top-right or near the operation controls.
- Ports to try (portsTextBox):
- Enter SSH port numbers, separated by commas (e.g., 22, 2222, 1022).
- The tool will attempt to connect on each specified port for each device. Defaults to 22 if left empty or invalid.
- Max Concurrent Sessions (concurrencyNumericUpDown):
- Set the number of devices to process simultaneously. Default is 10. (This control is at the bottom-left in the screenshot).
- Ping before attempting SSH Checkbox (pingBeforeSshCheckBox):
- If checked, the tool will ping each device before trying to connect via SSH.
- If the ping fails after the specified number of attempts, the device is skipped.
- Ping Attempts (pingAttemptsNumericUpDown):
- Visible if “Ping before SSH” is checked.
- Set the number of ping attempts (1-5, default 1).
3.6. Build New List Feature
This allows you to create a new device list based on parsing specific text from the output of commands run by your script. This section is typically below the target device specification.
- “Build new IP list based off output” Checkbox (buildListCheckBox):
- Enable this feature.
- List Name Textbox (newListNameTextBox):
- Specify the filename for the new CSV list that will be created (e.g., UBNT-Devices). .csv will be appended if missing.
- The new list will be saved in the current network profile’s routers folder.
- Identifier String Textbox (nameIdentifierTextBox):
- Enter a string that, when found in a command’s output, precedes the device name you want to extract.
- For example, if a command outputs hostname=MyRouter, you could use hostname= as the identifier. The tool will extract MyRouter. The extracted name will be anything after the identifier up to the end of the line.
3.7. Output Options
Control if and how command output from devices is saved. This section is typically located below credentials or near the bottom-left.
- Save device responses to file Checkbox (saveOutputCheckBox):
- If checked, the output of commands run on each device will be saved to a text file.
- Files are named DeviceName.txt or IP_Address.txt (if no name is available or a generic name is used). Existing files with the same name will be overwritten.
- Output Subfolder Dropdown (outputSubfolderComboBox):
- Select an existing subfolder within the current network profile’s device-responses folder to save output files.
- (Save to Root Device Responses Folder) option saves directly into device-responses.
- New Subfolder Name Textbox (newSubfolderNameTextBox):
- Enter a name for a new subfolder to be created within device-responses.
- Create Folder Button (createOutputSubfolderButton):
- Creates the subfolder specified in newSubfolderNameTextBox.
- Clean output for backups Checkbox (cleanOutputCheckBox):
- If “Save device responses” is also checked:
- Unchecked (Detailed Mode): Output files include timestamps, connection info, command text, exit statuses, and error messages along with the raw command output.
- Checked (Clean Mode): Output files will contain only the raw command output (or error messages if command execution fails). This is useful for backing up configurations or when only the direct output is needed.
- If “Save device responses” is also checked:
3.8. Operation Controls
These are primary action buttons, usually prominently placed.
- Run SSH Button (runButton):
- Starts the SSH process based on the current configuration.
- Disabled if necessary inputs (targets, script, credentials) are missing.
- Risky Script Warning: If the selected script contains keywords like reset, reboot, password, delete, erase, or format (not as comments), a warning message will appear asking for confirmation before proceeding.
- Stop SSH Button (stopButton):
- Becomes enabled when an SSH process is running.
- Click to request cancellation of the ongoing operations. It may take a moment for all active tasks to terminate.
3.9. AI Scripting Assistance
Leverage AI to help you with scripts. These buttons are part of the Script Management panel.
- Ask AI Button (askAiButton):
- Opens the “Ask AI for Scripting Help” window (see Section 7).
- Enabled if a script is selected and a Gemini API key has been set.
- AI API Key Button (setApiKeyButton):
- Opens a dialog to enter and save your Google Gemini API key (see Section 7.1).
3.10. Log Display
The large text area on the right is for logs, with buttons to access stored log files.
- Main Log Textbox (logTextBox):
- Displays real-time progress, status messages, connection attempts, command execution details (if not in clean output mode for saved files), and errors.
- Show Fail Logs Button (showLogsButton):
- Opens the logs folder for the current network profile in Windows Explorer, where *_failed_devices.log and runtime-*.log files are stored.
- Show Files Button (showDeviceResponsesButton):
- Opens the device-responses folder (or selected subfolder) for the current network profile in Windows Explorer, where saved command outputs are stored.
3.11. Status Bar
Located at the bottom of the window.
- Progress Bar (overallToolStripProgressBar):
- Shows the overall progress of the SSH task (devices processed / total devices).
- ETR Label (etrToolStripLabel):
- Displays the Estimated Time Remaining for the current batch of operations. Updates periodically. Shows “Calculating…”, “ETR: hh:mm:ss”, “ETR: Done”, or “ETR: Cancelled”.
4. Scripting Guide
The Mass Updater SSH Tool uses simple text files for scripts. Each line typically represents a command, but special directives allow for comments, variables, and conditional logic.
4.1. Script File Format
- Scripts are plain text files (e.g., my_script.txt).
- Store them in the MassUpdaterSSH\scripts\ folder (this location is global for all network profiles).
4.2. Basic Syntax
- Commands: Each line that is not a comment or a special directive is treated as a command to be sent to the SSH device.
- Comments: Lines starting with # are ignored and not sent to the device.
- Example: # This line is a comment
- Processing Order:
- Variable declarations (VARIABLE …) are processed.
- Comments (# …) are skipped.
- Variable substitution (${…}) occurs in commands.
- Conditional logic (IF_…, END_IF) is evaluated.
- Commands are sent to the device.
4.3. Variables
Variables allow you to define a value once and use it multiple times, or to make scripts more readable.
- Declaration: VARIABLE my_var=”some value here”
- The keyword VARIABLE is case-insensitive.
- Variable names should start with a letter or underscore, followed by letters, numbers, or underscores.
- The value must be enclosed in double quotes.
- VARIABLE declaration lines are not sent to the device; they are processed by the tool.
- Usage: ${my_var}
- In any command line, placeholders like ${my_var} will be replaced by their defined value before the command is sent to the device.
- Scope: Variables are defined per-device for the duration of the script execution on that device. They are reset for the next device.
- Undeclared Variables: If you use a variable (e.g., ${undefined_var}) that was not declared with a VARIABLE line, it will be replaced with an empty string, and a warning will be logged to the UI.
4.4. Conditional Logic
You can control the flow of command execution based on the output of the immediately preceding SSH command.
- IF_LAST_OUTPUT_CONTAINS “some text”
- Commands following this line, up to END_IF, will only execute if the complete output from the previous SSH command contained “some text”.
- The text to search for must be enclosed in double quotes.
- The search is case-sensitive by default.
- IF_LAST_OUTPUT_EQUALS “exact output line”
- Commands following this line, up to END_IF, will only execute if the complete output from the previous SSH command exactly matched “exact output line”.
- The text to match must be enclosed in double quotes.
- The comparison is case-sensitive and compares the entire output. Be cautious with multi-line outputs or outputs with trailing/leading whitespace; CONTAINS might be more robust.
- IF_DOES_NOT_CONTAIN “some text” (NEW)
- Commands following this line, up to END_IF, will only execute if the complete output from the previous SSH command did NOT contain “some text”.
- The text to search for must be enclosed in double quotes.
- The search is case-sensitive by default.
- If the condition is false (i.e., it does contain the text), commands between IF_DOES_NOT_CONTAIN and END_IF are skipped.
- END_IF
- This keyword marks the end of an IF_… conditional block. It is required for every IF_… statement.
- Nesting: Nested IF statements are not supported.
- “Last Output”: Refers to the complete string returned by the immediately preceding successfully executed SSH command. If a command itself fails (e.g., SSH error during execution, not a command returning a non-zero exit code), the “last output” for evaluation might be an error message string generated by the tool.
4.5. Example Script: Change UBNT AirOS AP Password
This script demonstrates checking if a UBNT (Ubiquiti) device running AirOS is in Access Point (Master) mode and then changes its password.
Filename: UBNT-AP-Change-Password.txt (Save this in your MassUpdaterSSH\scripts\ folder)
Plaintext .txt files
# UBNT airos

# Script to check if device is an AP and change password if it is.

# Command to show wireless mode and other info for the ath0 interface.

iwconfig ath0

# Check if the output of 'iwconfig ath0' contains "Mode:Master",

# which indicates it's an Access Point or a P2P Master.

IF_LAST_OUTPUT_CONTAINS "Mode:Master"

  # If the condition is true, the following commands will be executed.

  # Announce the action in the device's log (if logging is verbose on device).

  echo "Device is AP Master. Attempting password change."

  # The 'sed' command modifies the the /tmp/system.cfg file.

  # It finds the line starting with 'users.1.password=' and replaces the

  # entire line with 'users.1.password=NewPasswordHashValue'.

  #

  # IMPORTANT: 'NewPasswordHashValue' is a PLACEHOLDER.

  # You MUST replace this with the actual hashed password string from a

  # UBNT device where you have already set the new desired password.

  # 1. Manually set the new password on one UBNT device via its web UI or SSH.

  # 2. SSH into that device and view /tmp/system.cfg (e.g., 'cat /tmp/system.cfg').

  # 3. Find the 'users.1.password=...' line and copy the hashed value.

  # 4. Paste that hashed value in place of 'NewPasswordHashValue' below.

  sed -i "s!^users\.1\.password=.*!users.1.password=PLACEHOLDER_HASH_VALUE_HERE!" /tmp/system.cfg

  # Apply the changes and save them to persistent storage.

  # These commands might vary slightly based on AirOS version.

  #/usr/etc/rc.d/rc.softrestart save

  #ctgmd -f /tmp/system.cfg -w

  # For this example, we'll assume a simple save command: but you can uncomment the 2 before to try them all

  save

  # You might need to add 'reboot' as a separate command if necessary.
 # reboot


END_IF

# End of script
Explanation of the Example Script:
- # UBNT airos …: These are comments, ignored by the tool but helpful for humans.
- iwconfig ath0: This is the first actual command sent to the UBNT device. It displays wireless interface information.
- IF_LAST_OUTPUT_CONTAINS “Mode:Master”:
- The tool captures the output from iwconfig ath0.
- It then checks if this output string contains the exact substring “Mode:Master”.
- If true, the subsequent indented commands (until END_IF) are executed. If false, they are skipped.
- echo “Device is AP Master. Attempting password change.”: A simple command to log the action (useful for debugging on the device side if its logs capture echoes).
- sed -i “s!^users\.1\.password=.*!users.1.password=PLACEHOLDER_HASH_VALUE_HERE” /tmp/system.cfg:
- This is the core command for changing the password.
- sed is a stream editor common on Linux-based systems (like AirOS).
- -i modifies the file in place.
- “s!^users\.1\.password=.*!users.1.password=PLACEHOLDER_HASH_VALUE_HERE!” is the substitution expression:
- s means substitute.
- ! is used as a delimiter instead of the usual / to avoid issues if the hash contains /.
- ^users\.1\.password=.* is the pattern to match: a line starting (^) with users.1.password= followed by any characters (.*). The . in users.1.password is escaped with \ to match a literal dot.
- users.1.password=PLACEHOLDER_HASH_VALUE_HERE is the replacement string. You must replace PLACEHOLDER_HASH_VALUE_HERE with the actual password hash.
- /tmp/system.cfg is the file being modified. This is a temporary configuration file; changes usually need to be saved to persistent storage.
- save: This command is typical on AirOS devices to write the changes from /tmp/system.cfg to the persistent flash memory. The exact command might vary (e.g., cfgmtd -w -p /etc/ followed by /usr/etc/rc.d/rc.softrestart save or just save). Consult your device’s documentation.
- END_IF: Marks the end of the conditional block.
To use this example:
- Make sure your first test device is local where you can press reset button and try again if needed.
- Replace PLACEHOLDER_HASH_VALUE_HERE with the correct password hash.
- Verify the save command or replace it with the appropriate commands for your AirOS version to ensure changes are permanently saved. Consider if a reboot command is needed.
- Save the script as UBNT-AP-Change-Password.txt in the tool’s scripts folder.
- Select this script in the UI when targeting your UBNT devices.
5. Running an SSH Task
Follow these steps to execute a script on multiple devices:
- Select/Create Network Profile:
- Choose an existing profile from the “Network Profile” dropdown or create a new one.
- Configure Target Devices:
- Using a List: Ensure “Use Subnet(s) Instead” is unchecked. Select your .csv device list from the “IP list” dropdown. Create or edit the list if necessary.
- Using Subnets: Check “Use Subnet(s) Instead”. Enter the CIDR notation(s) in the “Subnet Input” textbox.
- Select/Create Script:
- Choose your desired .txt script from the “Scripts” dropdown. Create or edit if necessary.
- Add SSH Credentials:
- Enter username/password combinations in the credentials section and click “Add Credential”. Add all credentials you might need; the tool will try them in order.
- Set Execution Parameters:
- Ports: Enter the SSH ports to try (e.g., 22).
- Concurrency: Adjust “Max Concurrent Sessions”.
- Ping: Check “Ping before attempting SSH” and set “Ping Attempts” if desired.
- Configure Build List (Optional):
- If your script is designed to extract device names and you want to build a new list, check “Build new IP list…”, provide a “List Name”, and the “Identifier String”.
- Configure Output Options (Optional):
- Check “Save device responses to file” if you want to log output from each device.
- Select or create an “Output Subfolder”.
- Check “Clean output for backups” if you only need the raw command output.
- Click “Run SSH”:
- The process will begin.
- Risky Script Warning: If your script contains keywords like “reset”, “reboot”, “password”, “delete”, “erase”, or “format” (not as comments), a warning message will appear asking for your confirmation before proceeding.
- Monitoring the Process:
- The main Log Textbox will show detailed progress, including connections, command execution, and any errors.
- The Progress Bar in the status strip will show the percentage of devices processed.
- The ETR Label will provide an estimate of the time remaining.
- Stopping the Process:
- Click the “Stop SSH” button. The tool will attempt to cancel all active operations. This may take a few moments.
6. Managing Output and Logs
The tool generates several types of logs and output files:
- Runtime Command Error Log:
- Location: MassUpdaterSSH\[networks\<ProfileName>]\logs\runtime-<timestamp>.log (or MassUpdaterSSH\logs\ for Default profile).
- Content: Logs errors that occur during the execution of a specific command on a device (e.g., command not found, permission denied, non-zero exit status if not in clean output mode).
- Failure Log:
- Location: MassUpdaterSSH\[networks\<ProfileName>]\logs\<timestamp>_<ListNameOrSubnet>_failed_devices.log (or MassUpdaterSSH\logs\ for Default profile).
- Content: Created after a run completes (and was not cancelled) only if one or more devices failed all ping attempts (if ping was enabled) or all SSH credential/port attempts. It lists the IP and Name of these devices.
- Device Response Files:
- Location: MassUpdaterSSH\[networks\<ProfileName>]\device-responses\[OptionalUserSubfolder]\<DeviceNameOrIP>.txt (or MassUpdaterSSH\device-responses\ for Default profile).
- Content: If “Save device responses to file” is checked, this file contains the output from the script for a specific device. The content depends on whether “Clean output” was checked. Files are overwritten on subsequent runs for the same device.
- UI Log:
- The main textbox in the application window provides a live, detailed log of the current session’s activities. This log is not automatically saved to a file but can be copied.
- Use the “Show Fail Logs” and “Show Files” buttons for quick access to these folders.
7. AI Scripting Assistance (FormAskAI)
The tool can help you write or refine your SSH scripts using Google’s Gemini AI models.
7.1. Setting Up the Gemini API Key
Before using the AI features, you must provide your own Google Gemini API key.
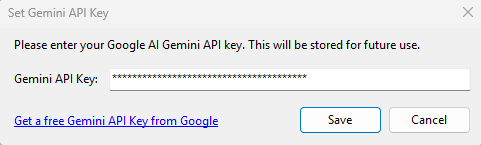
- Click the “AI API Key” button on the main form. This opens the “Set Gemini API Key” dialog.
- Obtain an API Key: If you don’t have one, click the “Get a free Gemini API Key from Google” link (or navigate to https://ai.google.dev/gemini-api/docs/api-key) and follow Google’s instructions to create an API key.
- Enter Your Key: Paste your Gemini API key into the “Gemini API Key:” textbox.
- Save: Click “Save”. The key will be stored securely in your user settings (My.Settings.UserGeminiApiKey) for future use.
7.2. Using the “Ask AI” Form
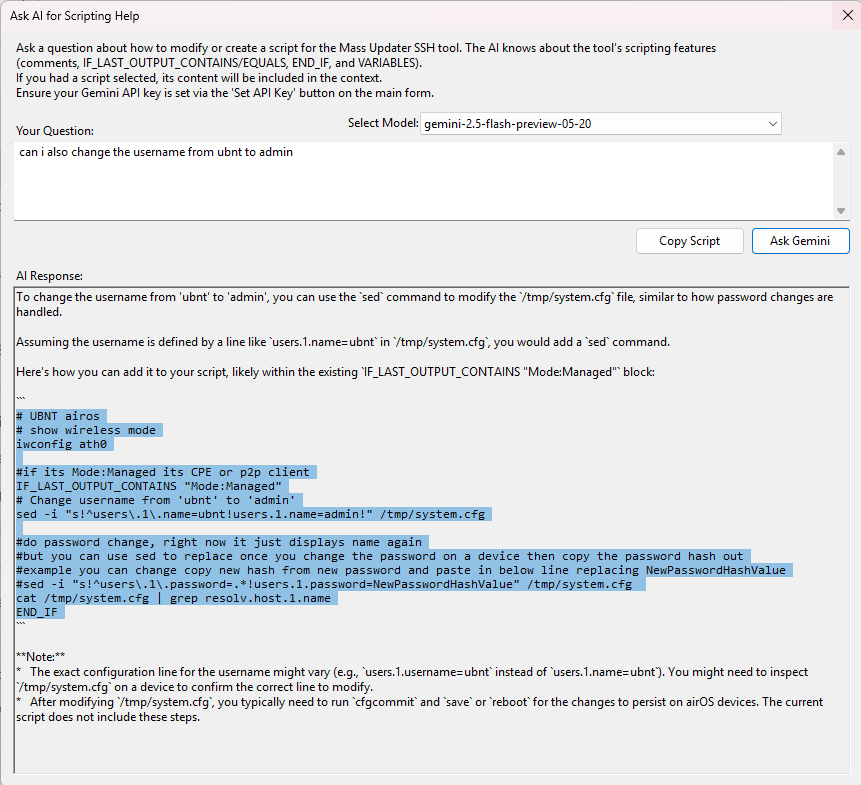
- Select a Script (Optional but Recommended): On the main form, select the script you want help with from the “Scripts” dropdown.
- Open Ask AI: Click the “Ask AI” button. The “Ask AI for Scripting Help” window will appear.
- Instructions: Read the instructions at the top of the window. They remind you that the AI is aware of the tool’s specific scripting syntax (comments, variables, IF conditions). If you had a script selected, its content is automatically included in the context sent to the AI.
- Select Model (modelComboBox):
- The dropdown will attempt to load compatible Gemini models that support content generation (e.g., gemini-1.5-flash-latest, gemini-1.0-pro).
- Select your preferred model. The tool will remember your last selection.
- If models fail to load, check your API key and internet connection.
- Enter Your Question (userQuestionTextBox):
- Type your question about how to create or modify a script for the tool. Be specific. For example: “How can I write a script to check the uptime of a device and then get its serial number only if the uptime is greater than 1 day?”
- Submit (submitQuestionButton):
- Click “Ask Gemini“. The tool will construct a detailed prompt (including the tool’s syntax, your selected script, and your question) and send it to the AI.
- View Response (aiResponseRichTextBox):
- The AI’s response will appear in this textbox. It may take a few moments.
- Script blocks provided by the AI (enclosed in triple backticks “`) will be formatted with a monospaced font and a light gray background for readability.
- Copy Script (copyScriptButton):
- If the AI response contains a script block (…), this button will become enabled.
- Click it to copy the content of the first detected script block to your clipboard. You can then paste this into a new or existing script file.
8. Troubleshooting / FAQ
- “My credentials are not working.”
- Ensure the username and password are correct.
- Verify the device supports password-based SSH authentication.
- Make sure the correct SSH port(s) are specified in the “Ports to try” textbox.
- Check if a firewall is blocking SSH access to the device.
- The tool tries credentials in the order they appear in the list.
- “The script doesn’t execute on any device.”
- Verify your device list (CSV) or subnet configuration is correct and devices are reachable.
- Check the “Ping before SSH” option. If enabled, devices must respond to ping.
- Ensure at least one credential and one port lead to a successful login.
- Examine the main Log Textbox for connection errors or other messages.
- “AI models are not loading or AI returns an error.”
- Ensure your Gemini API Key is correctly entered via the “AI API Key” button.
- Verify you have an active internet connection.
- Check your Google AI/Cloud console for API quota limits or billing issues.
- Try a different AI model from the dropdown if available.
- “What does ‘Clean Output’ do?”
- When “Save device responses” is checked:
- Clean Output UNCHECKED: Saved files include detailed logs: timestamps, connection info, command sent, exit status, errors, and the actual command output.
- Clean Output CHECKED: Saved files contain only the raw output from the commands, or an error message if the command itself failed to execute. This is useful for creating direct backups of configurations.
- When “Save device responses” is checked:
- “Data Migration Message Appeared.”
- This is a one-time process if you updated from an older version. Your existing local data (router lists, scripts, etc.) has been moved to the AppData folder (C:\Users\<YourUsername>\AppData\Roaming\MassUpdaterSSH) to keep things organized per user.
- “Where are my failure logs?”
- Failure logs (*_failed_devices.log) are generated in the logs subfolder of your active network profile if any devices could not be reached or logged into, and the process wasn’t cancelled. Click “Show Fail Logs”.
- “A command with $ in it is not working as expected.”
- If your command legitimately needs a $ character (e.g., for shell variables on the remote device), and it’s being mistaken for a tool variable ${…}, there isn’t an explicit escape mechanism mentioned for the tool’s variable processor. You might need to test how it behaves or avoid such conflicts if the tool tries to substitute it. For simple $ (not ${), it should pass through correctly.